
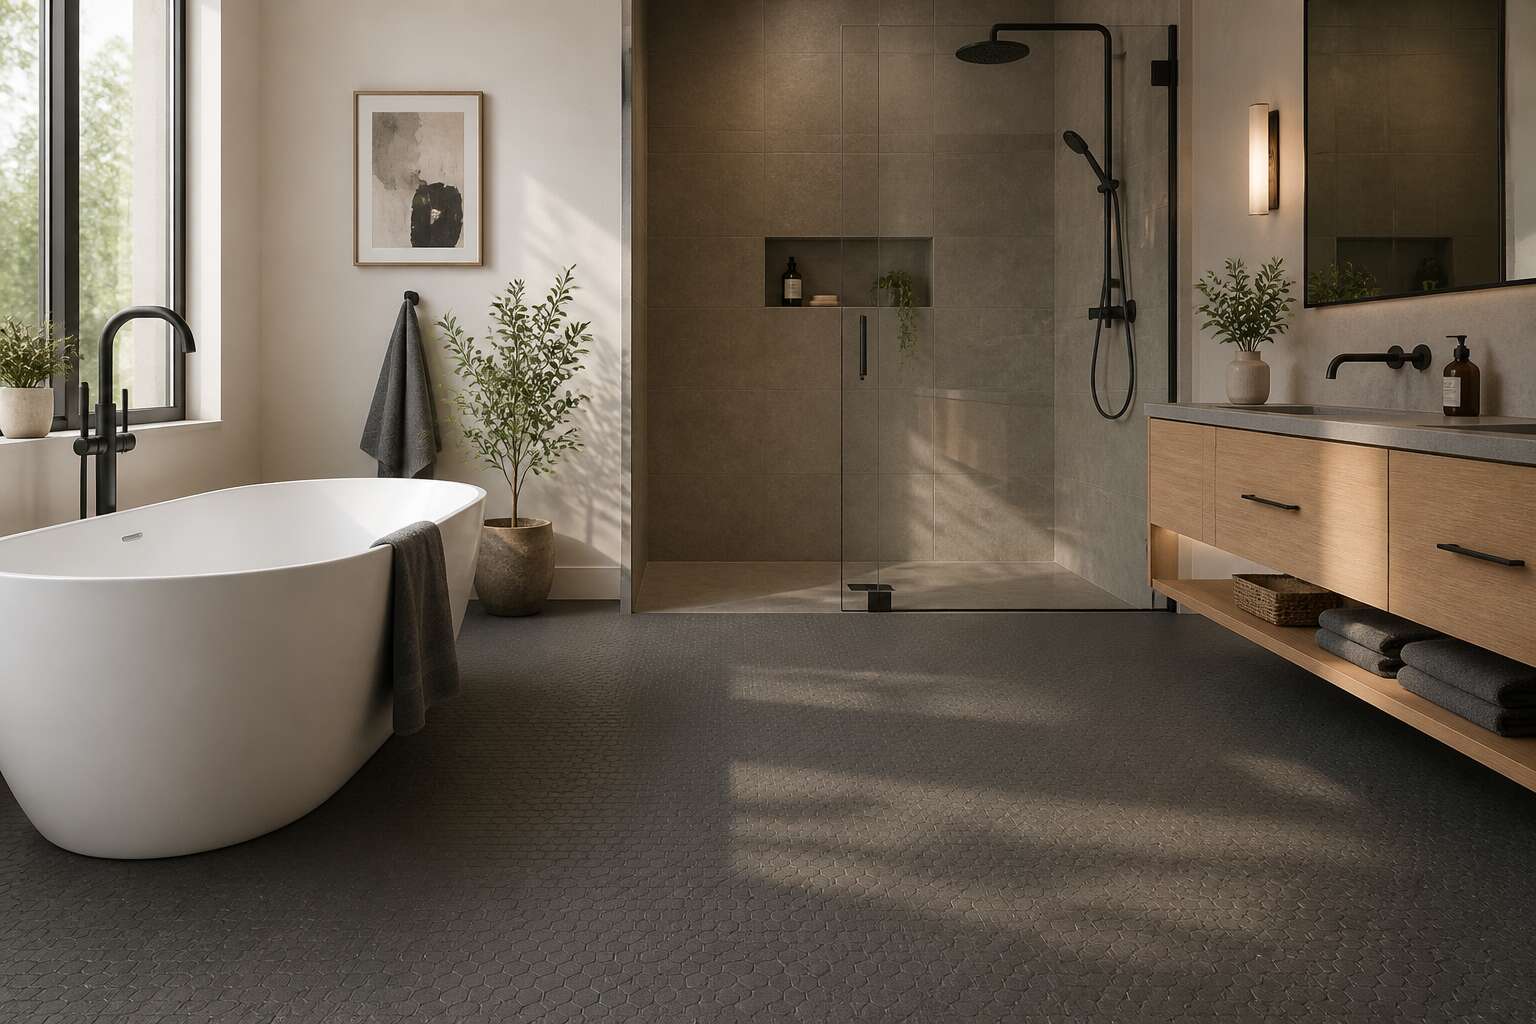
Why Choose Rubber for Your Bathroom Space
Slip Resistance and Water Protection
The bathroom floor in a South African home endures more water than any other surface. Over time, ceramic tiles become treacherous when soap and steam create a slick film. A rubber floor bathroom offers a tactile surface that holds your footfall firmly, even when water pools. The material’s closed cell structure resists moisture absorption, so water beads on the surface rather than seeping into the subfloor. That prevents damage to the foundation and eliminates the damp odour common in many bathrooms.
Consider these protective properties:
- Surface texture that increases friction when wet
- Sealed seams that stop water migration
- Mould resistance from non porous material
During load shedding, bathrooms turn pitch black. A rubber floor bathroom gives you secure footing when you step out of a shower onto a dark floor. Water protection extends beyond the surface. The material’s flexibility forms a continuous barrier, so moisture cannot creep along edges. That matters in coastal provinces where humidity attacks every joint and crevice.
Comfort Underfoot
Your feet carry you through every bathroom visit, yet most floors ignore them. A rubber floor bathroom changes that, and the difference is immediate! I have stood on cold tile at 5am and felt the shock travel up my spine. Rubber cushions each step, absorbing impact before it reaches your knees or lower back.
This material also keeps warmth close. Unlike ceramic or stone, rubber does not draw heat from your skin. It offers a stable, quiet surface that reduces the clatter of morning routines. For families with young children or elderly members, the slight give of rubber provides a comfortable surface.
- Softer landing for bare feet
- Natural thermal retention
- Reduced noise transmission
The resilience of a rubber floor bathroom adds comfort without demanding maintenance. It simply makes the space feel more humane!
Eco-Friendly and Sustainable Options
Your bathroom floor silently contributes to your home’s environmental footprint. Standard tiles often require energy intensive manufacturing and end up in landfills. A rubber floor bathroom offers a different path. Rubber can come from recycled tires or sustainable plantations, giving waste a second life. I have seen homes in Cape Town transform their spaces with this material, reducing their impact without sacrificing durability.
The manufacturing process for rubber flooring consumes less water than ceramic production. Many products are fully recyclable at the end of their lifespan.
- Made from renewable tree sap or reclaimed rubber
- Free from harmful phthalates and PVC
- Lower carbon footprint during production
Choosing a rubber floor bathroom means your renovation aligns with responsible consumption. It is a practical decision that keeps resources in circulation.
Long-Term Cost Efficiency
Over a 20 year span, a bathroom floor can cost more in maintenance than its original purchase price. Homeowners rarely factor in cleaning agents, repairs, and premature replacement. A rubber floor bathroom resists this cycle. The material absorbs daily stress without cracking, so installation costs spread across decades, not years. Consider what you avoid paying for:
- Chemical cleaners designed for grout lines
- Water damage repairs from leaking subfloors
- Professional regrouting or resealing services
The initial price may invite comparison with ceramic, yet the lifecycle cost of a rubber floor bathroom tells a different story. Fewer replacements mean fewer purchases, less labour, and zero disposal fees. I have watched homeowners in Johannesburg spend once and walk away satisfied. That kind of efficiency does not require compromise. It simply requires the right material.
Style and Color Variations for Modern Interiors
Matching Tiles and Textures
The days of stark, sterile bathroom floors are over. Modern rubber flooring mimics raw slate, honed concrete, or textured wood grain, bringing depth to a room that once felt flat.
Matching these surfaces to ceramic tiles requires attention to gloss level and veining. I favour a matte rubber floor bathroom paired with high-gloss wall tiles. The contrast catches light without feeling garish. For cohesive looks, consider these pairings:
- Warm greige rubber flooring with large-format porcelain.
- Charcoal textured rubber against white subway tile.
- Terrazzo-style rubber accents beside honed stone.
The floor itself presents a design opportunity. A textured finish that complements adjacent tiling creates a seamless flow that feels intentional and quietly refined.
Coordinating with Fixtures and Vanities
Colour in a rubber floor bathroom does more than decorate; it sets the psychological temperature of the space. Deep forest greens and burnt umbers echo the South African landscape, while pale alabaster tones open up compact layouts. The material accepts pigment richly, so hues remain true even under humid conditions.
Fixtures and vanities should converse with the floor, not compete. A matte black vanity against warm graphite rubber flooring creates a grounded, deliberate composition. Brass taps introduce a glint of warmth. Consider these pairings:
- Onyx flooring with a white ceramic basin and brushed nickel.
- Sand-toned rubber with a dark oak vanity and matte bronze.
- Slate-grey rubber with a floating concrete vanity.
The finish of your rubber floor bathroom alters perception. A smooth, polished surface reflects light; a textured grain absorbs it. For a cohesive interior, match the undertone of the floor to the veining in your countertop. This alignment creates a quiet visual rhythm.
Custom Patterns and Accents
South African designers specify the rubber floor bathroom for its adaptability as much as its durability. The material accepts bold gestures, with geometric inlays and hand-cut metallic flecks appearing directly in the flooring. Custom patterns emerge during manufacturing, so colour blocking and subtle texture shifts coexist within one seamless layer. A monochrome palette reads as architectural; a split-tone arrangement brings quiet motion.
Pattern placement should follow the room’s logic, and I find these approaches work well in contemporary spaces:
- A gradient fade from the doorway to the bath edge
- A subtle grid of contrasting rubber studs near the basin
- A hand-laid border that picks up the window frame’s colour
Each of these details moves the rubber floor bathroom beyond its heritage as a purely practical finish. Pigment variations, from charcoal to ochre, lend the room a distinct temperament without crowding it. The floor reads as an integrated design language, not as an afterthought.
Proper Installation and Upkeep for Longevity
Preparing the Subfloor
A rubber floor bathroom is only as resilient as the foundation beneath it. Many homeowners focus on the visual surface, yet the true craftsmanship happens before the first sheet or tile is ever laid. In fact, statistics from the construction industry show that over 70% of premature flooring failures stem from inadequate subfloor preparation.
For new builds, the concrete slab needs a thorough curing period. Moisture tests are non negotiable. A simple plastic sheet test can reveal trapped humidity, but a digital hygrometer gives a precise reading. For renovations, the existing screed or timber base must be assessed for loose sections and structural movement. Any imperfection will telegraph through the rubber over time, though the material’s flexibility does forgive minor undulations.
The preparation sequence follows a specific order of operations to guarantee adhesion and a flawless finish.
1. Level the surface using a self levelling compound where dips exceed 3 millimetres.
2. Grind down high spots or protruding nail heads on timber subfloors.
3. Vacuum meticulously to remove every grain of dust and debris.
4. Apply a primer suited to your specific substrate, whether porous concrete or wooden boards.
5. Acclimate the rubber flooring in the room for at least 24 hours before installation.
Once the floor is installed, upkeep centres on pH neutral cleaners. Harsh chemicals degrade the rubber’s molecular structure over time, leading to brittleness. I have seen beautiful rubber floor bathroom installations ruined within a year due to abrasive scouring pads. For daily maintenance, a microfiber mop with warm water suffices. For deeper cleans, a dilution of mild soap works wonders. The golden rule is to wipe spills immediately, especially oils and solvents. These substances break down the rubber’s protective surface, leaving unsightly stains that are nearly impossible to reverse.
Adhesive vs. Floating Methods
Every rubber floor bathroom begins with one of two installation paths. Adhesive methods bond the material directly to the subfloor, creating a permanent, watertight seal. Floating methods use interlocking edges, allowing the floor to expand and contract independently. This choice shapes long term durability.
For wet zones, adhesive wins on edge protection. Water simply cannot creep beneath. Floating installations demand precise expansion gaps along the perimeter, and those gaps need regular inspection. Upkeep differs too! Routine sweeping removes abrasive grit that scratches either surface. A damp mop with pH neutral cleaner works weekly.
There is a maintenance sequence worth adopting:
- Wipe spills within minutes
- Use felt pads under heavy fixtures
- Avoid steam mops that force heat into seams
Years later, the repair path reveals itself. Adhesive makes single tile replacement difficult. Floating allows simple panel swaps. Wet areas favour adhesive; floating suits rooms where future access matters.
Cleaning and Sealing Recommendations
A bathroom floor that fails within a year is rarely a material problem. For a rubber floor bathroom, the fix lies in acclimatisation. Allow sheets to rest for 24 hours before laying. Skipping this step invites buckling later. After installation, keep the space unoccupied for 48 hours so the bonds cure fully.
Upkeep is straightforward. Sweep daily with a soft brush. Mop weekly with diluted pH neutral soap. Bleach, vinegar, and ammonia break down the protective seal and leave a dull haze.
A rubber floor bathroom rarely needs a penetrating sealer. Most products arrive with a factory finish. Instead, apply a suitable polish annually to refresh the sheen and add a sacrificial layer. Chemical spills need immediate wiping.
One practice I swear by:
- Place an entrance mat outside to trap abrasive grit.
- Use floor protectors under heavy fixtures.
Cleaning agents labelled for rubber floors protect the surface best.
Repairing Scuffs and Tears
Scuffs and tears on a rubber floor bathroom surface are cosmetic events with practical fixes. A boot heel drag often leaves a dark mark that lifts with a lightly dampened melamine sponge. Rub in small circles, no pressure needed.
For deeper gouges, cut away loose material with a sharp blade. Clean the depression with isopropyl alcohol and let it evaporate. Fill with a colour matched rubber repair compound. Press it flush with a putty knife, then allow a full 24 hour cure.
- Melamine sponge for surface scuffs
- Utility knife with a fresh blade
- Rubber repair compound in a matching shade
- Seam roller for lifted edges
A raised seam in a rubber floor bathroom invites moisture under the surface. Use a syringe to inject contact adhesive, then roll it flat. Weight the seam for an hour. This work is straightforward but must happen quickly. Moisture does not pause for convenience.
When to Consider Professional Help
Longevity in a rubber floor bathroom is decided in the first hours. The subfloor must be level, dry, and free of debris. Materials should acclimatise in the room for 48 hours before cutting. The process follows a clear order:
- Prime the subfloor to promote adhesion.
- Spread adhesive evenly with the recommended trowel.
- Lay the rubber sheet or tile and roll it thoroughly.
Rolling removes trapped air and bonds the layers. A seam roller finishes the joints while the adhesive is still open. Upkeep is straightforward and consistent. Sweep and damp mop with a pH neutral cleaner. Skip waxes and polishes. A rubber floor bathroom will then hold its colour and integrity through many wet seasons.
Professional help becomes necessary when the substrate is suspect. Call a contractor if moisture testing shows high readings, if the floor spans more than 30 square metres, or if heat welding is required. These elements are not forgiving.
Performance and Resilience in High-Moisture Environments
Waterproofing and Mold Resistance
In the steamy corners of a South African bathroom, moisture finds every seam. A rubber floor bathroom handles this reality better than most surfaces. The material’s dense composition leaves no porous pathways for water to seep through, so the subfloor stays dry season after season.
Mold needs organic food and lingering dampness to thrive. Rubber offers neither. Its surface resists the buildup that feeds mildew, and a quick wipe removes soap scum before it settles. For homes along the KwaZulu-Natal coast, where humidity sits heavy in the air, this resilience matters.
Consider what happens during a busy morning. Steam rises, water splashes, and the floor takes it all. The waterproof membrane does not crack or swell, unlike timber or laminate. It simply sheds the moisture and dries fast. A rubber floor bathroom stays fresh and hygienic without constant maintenance.
Impact and Damage Resistance
I have seen rubber floors in busy family bathrooms. They take the punishment. A rubber floor bathroom absorbs impact without a single permanent mark. Drop a steel water bottle and the surface rebounds. Vinyl would tear. Ceramic would chip. Rubber shrugs it off.
High moisture never softens the material. Steam and standing water attack the seams first on most floors. Rubber’s structure stays intact. It does not swell, warp, or lose its grip over time.
Performance checklist:
1. Heavy basins do not indent the surface.
2. Constant shower drips cause no erosion.
3. Accidental tool drops leave no damage.
Sound Absorption Qualities
Silence is rare in a bathroom. Then rubber changes the room’s entire character. A rubber floor bathroom survives moisture conditions that destroy other surfaces, not by coating itself, but through its dense, closed-cell composition. Water sits on top, never seeps inward. Steam settles and rolls away. The material remains stable after years of hot showers and spilled buckets.
Sound absorption is equally profound. The same density that blocks water also traps noise. Impact sounds like footsteps or falling objects lose their sharp edge. Echoes fade quickly, making the space feel calmer and more private.
- Toilet flush echoes soften noticeably.
- Running water becomes a gentle hum.
- Voices carry less between rooms.
This acoustic isolation offers a psychological buffer. The rubber floor bathroom, with its quiet resilience, becomes a retreat, not a loud functional zone.
Compatibility with Heated Floors
South African winters make heated floors a luxury worth considering. A rubber floor bathroom performs admirably under both steam and radiant heat. The material conducts warmth efficiently, so your toes get the benefit, not the floorboards. Thermal cycling, the daily expansion and contraction from heating and cooling, leaves rubber untroubled.
High moisture environments test every surface. Rubber responds by ignoring moisture. It doesn’t swell, warp, or delaminate. The same closed-cell structure that blocks water also holds up to repeated thermal stress. Compatibility with underfloor heating is excellent when the system operates within manufacturer guidelines. If you are weighing a rubber floor bathroom against tiled alternatives, this pairing deserves attention.
Consider these points:
- Rubber stays pliable at typical heated floor temperatures.
- The surface cools slowly, adding comfort after stepping out.
- Moisture trapped between floor and heater can’t damage the rubber.

0 Comments